Microcontrollers are great. You can do anything from water your garden to catch wildlife trash diggers in the act—and on the cheap. I prefer to use the Arduino microcontroller because of the large and helpful community built around the website. Though it is my favorite, there are some drawbacks to using an Arduino board in every project. It gets expensive, the board can take up too much space, and the rat's nest of breadboard wires are a pain to repair.
Luckily, Arduino is open-source hardware and we can make our own customized boards with the information provided by the Arduino team themselves! There are an infinite number of ways to make an Arduino circuit, so we will cover the most important things to take into account in designing a board for your project.
Size Constraints
How large is your project? Is it mounted on a wall? Does it need to fit in your pocket? The space constraints will determine what components you use and the number of sensors and outputs that can fit. If you need a full Arduino board but are limited on space, you can buy the Arduino Nano or Pro Mini fully assembled.
 Image from Arduino
Each has the full set of Arduino pins and is fully compatible with any of your large Arduino projects. Note that the Pro Mini requires some soldering skills.
 Image from Arduino
Overkill
If you only need a few lights or sensors, a full Arduino chip may be overkill. To keep the circuit board small, you can use a different AVR chip with fewer pins. You can even use the original Arduino board as a programmer to upload the code! Any ATtiny chip will work.
 Image from toasterbotics
The ATtiny85 is a nifty 8 pin controller in a tiny package perfect for those portable projects that need to be lightweight with a low footprint.
 Image from Fork Robotics
For half the pins of the normal Arduino Atmega 328, the ATtiny84 is a 14 pin chip with 12 digital pins for inputs and outputs.
Operating Voltage
The traditional Atmega 328 chip that comes with your factory Arduino runs on 5 volts and outputs a 5 volt signal to the digital pins. Some other chips and components you want to interface with may run on 12 or even 3.3 volts. For a simple LED display, a 3.3 volt chip like the ATtiny85 can run with just a battery and an LED with no extra components. For a 3.3 volt project with more than 8 pins, the ATtiny84 can run 12 LEDs, sensors, and motors all at from a minimum 1.8 volts!
Lifespan
How much wear is your project likely to take? Is it going to be strapped to the neck of a wild jaguar? Is it to be encased in Kevlar and lead? Never set eyes upon by human beings? If it's going to be jostling around in a space shuttle, your circuit needs to be absolutely permanent.
 Photo by joseherworld
When a flimsy breadboard won't cut it, you have to fabricate your own custom circuit boards.

I made the circuit board below for the lucid dream goggles. It uses an ATtiny 85 and Arduino software!

If your project is just taking a peaceful stroll around the block before returning safely home each night, a prototyping perfboard (perforated board) will give you sufficient strength without the hassle of designing and etching a unique board.

Robot and Motor Drivers
Projects with motors require special accessories to work properly. If you are building a robot, blender, or a CNC machine, you will need a motor driver circuit on your board. A motor driver allows the Arduino to reverse the voltage going to each motor and reverse the rotation of the wheels and gears. This is necessary even if you are using a full-sized Arduino for your robot.

The motor controller above is designed to fit on top of a normal Arduino board.
If you're using your custom controller as a robotic prototyping platform, it's handy to connect all motors and batteries to your board via screw terminals. These connectors are sturdy enough for off-road robo-adventures and they make replacing components a snap.
Remote Control
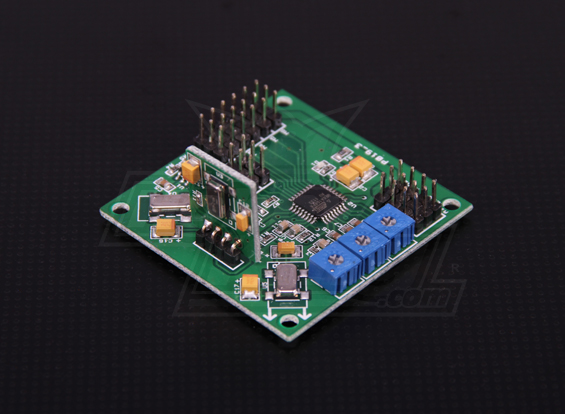
Remote control modules like the Xbee interface great with a regular Arduino and run on 3.3 volts. For a tiny lightweight helicopter, a small Xbee and 3.3 volt AVR chip (ATtiny85 or 84) with a strong motor and driver could be compacted on a small etched circuit board to provide maximum control with minimal power and parts. This board uses a tiny surface mount Atmega 168:
 Image from Hobbyking
Final Suggestions
- It is always worth having a full Arduino board for prototyping and programming your custom boards. If you want to get rid of the original Arduino altogether, you can use an FTDI cable to program your board directly from the USB socket on your computer.
- Save all your circuits! Write them down or design them on the computer. You will need those diagrams when you start building onto your past projects!
- If you can solder, making a custom microcontroller is actually easy as pie. The hard part is figuring out exactly what you want it to do before you solder.
Is an Arduino board too much for the project you are working on? Share your thoughts and seek guidance on your custom microcontroller adventure by posting in the forum or writing in the comments below. If you have a project, don't forget to enter to win a lucid dreaming kit by posting a picture to the Mad Science corkboard. Let the Mad microcontrollers proliferate!


Comments
No Comments Exist
Be the first, drop a comment!